Well, this is wrong and thru this article I’ll try to demonstrate that with a little of patience and manuality it’s possible to superdetail a plastic model without photoetched parts and to take even more satisfaction.
Kit analysis and building strategy

I chose an Italeri’s kit, nr. 6442 – Autoblindo italiano AB 41 in 1/35 scale, but what I’m going to say is valid for every kit.
First of all, we have to take as many photografic references as possible about the vehicle we’re going to build, by referring to Internet, friends and publications; this is an essential step because the more references we have, the easier the reproduction of details will be.
I only surrendered to the aftermarket to buy the necessary turret of Royal Model (which can be furtherly improved, by the way) and the “Libia”-type wheels.
As a matter of fact, I decided to detail my model kit without using photoetched sets, by building in scratch all the wrong parts of the kit or by building those which are essential to obtain the late version of the vehicle, as in my project.
Matherials and tecniques in detailing
I’ll go over the standard assembling sequence to concentrate the attention on my detailing tecniques and materials I need to reach the result.
Reworking kit parts
This is my usual practice during assembling steps: reduce the thin of armour plates and similiar details is important to give a realistic shape to the model; to make this I use cutter, rasps in various shape and quality (from handcare tools to modelling tools), sandpaper, always with an eye to collected references.

The Y shape support of antenna of our AB41 is an emblematic case: for easily reworking and make it thin I decided to remove it from base and using raspes I removed the exceeding part. During this practice is necessary to watch the photographic references. A little tip: to support my references and using as guideline I downloaded from the web some instruction guides of photoetched sets from some of manufacturers.
Also the armoured covers of the front lights can become better sanding the exceeding plastic from each side to make it thin. The same treat for the armoured ports of driver’s windows.

More complex is the way to make thin the sides access ports. We can work from inside but some plastic failures on external surface forced me to remove the six external rivets around each pistol port, sanding the surface with careful and reallocate rivets in the same right position.

We need a lot of dry simulation to reach the best result and verify the correct thicknes and position and than we can fix the ports with glue. The upper section of the ports was also detailed with some little plasticard parts to simulate the supports of the hinge.
Another exemple of reworking kit parts is the new plate for fixing spare wheels.

Using nipper, cutter and rasps I removed the external part of the spare wheel and detailed the rest of the plate with plasticard. We always need to permanent consulting the reference.
Typical exemple of kit part reworking is the emptying and the thinning of the rear lights parable;

I inserted the light bulb from a worked section of plasticard rod. During this step I used a singular technique to obtain the transparent part of the lights using acetate sheet from transparent boxes or from tipographic materials ecc.

Starting from kit part I obtain a new transparent part pushing it in a warmed acetate leaf. Then I cut and work it from the acetate until I obtain the right shape.

A little difficult but very useful for the best result.
Finally, the horns. I make them dig and thin with the help of drill bits and detailed in the rear part using different thin sections of plasticard.

Often, when I remove plastic from surfaces, they become rough. In the horns, for exemple, I softly brushed the inside with fluid plastic glue to make them soft again. Make it with careful because it’s easy to damage the fine details around.
Plasticard
Laminated and extrused in different shape, this is is the essential material for modellers who begin the practice of detailing and scratch building.

I employed often sprue parts, cool and warm reworked. A clear exemple is the building of the new exaust silencer in four tubes shape.

Well, I used four sections of sprue in correct extension and diameter, glued together with a plastic soul in square shape. The new exaust silencer had to reworked from a side to obtain a single tube. The terminal tube is from a sprue warm worked. It was detailed with welded stripes obtained from a wire of sprue glued with fluid plastic glue. All of this is cheap and realistic.

I built in scratch six hand stoppers for lock on inspection ports on engine roof using sections of sprue warm worked and small sections of plarticard rods drilled, than glued with fluid glue.
Little metal tubes, plastic rods & metal wires.
Building the antenna in scratch give me the opportunity to describe this kind of materials: the main antenna was replaced with plastic rod,

The base is nothing than a section of sprue detailed with small parts of plasticard.The final part in star shape, was made starting a thin disk of plasticard on wich were fixed six arms as rays of exagon combining in telescopic way a section of syringe needle and copper wire. All strongly fixed with cyanoacrilate. To set stopped the parts during the composition of the star antenna I fixed the arms on an adesive paper film during the application of cyanoacrilate glue. It could be difficult but is easy and very realistic result.
Another typical use of syringe needle is the replacement of light armament for the vehicle defence: in this case the rear machinegun Breda 38 cal. 8 mm recived a new gun obtained from an appropriate syringe needle.

After removing the kit part, make a drill on the mantlet and fix the needle section in perfect axis. Before fixing the machinegun on hull plate remember to drill the mantlet in the pointer position. A little but often forgotten detail.
The main gun, the light gun Breda 35 cal. 20 mm, was also replaced with a copper tube, making better the realism of the resin turret.
The copper wire is another material largerly used in detailing plastic modelkits: was just used in replacing antenna arms but is wonderful in replace handle, hooks, rings, etc.

I replaced the running board under side access ports or power cables on rear lights or on smoke bomb rack.
Thin plate
Another useful material is the thin plate, buying in fine art shop.
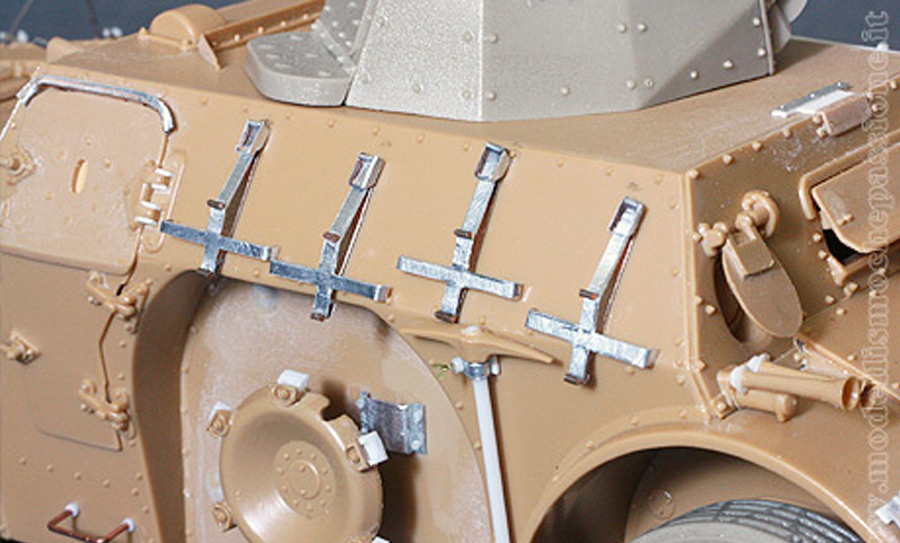
Details like dropstoppers over side access ports and visors are often welded with the armoured plates of the kit. It’s necessary remove them with careful and make perfectly clean the area before replace them. The work is very delicate becouse is easy damage useful details. With patience, cutter, rasp and fine sandpaper we remove the wrong detail and make a new dropstopper with thin plate; we build a new little “L” shape profile bended in a large “U” shape just like the removed ones.

The new profile will be fixed with cyanoacrilate using a little glue. I suggest to valuate the real need to replace this kind of details. I decided to leave kit parts over visors on front and rear plates; the danger to damage all near details was too high.
Thin plate cutted in stripes is very useful to replace holders for external tools as pick and shovel. Cutted in shape will replace the showel itself on wich we can press the fixing nuts and replacing handle with one made with plastic rod.

The combination of thiny strips of plasticard and thin plate stripes were used in building the jerry cans racks in front of the mudguards.
The thin plate may be used to made complex parts. Designing with accuracy the cutting and the folding it’s possible to build metal boxes for external stowage.

In this case the smoke bomb rack on the rear and the spare smoke bomb rack on the rear engine cover plate were built, according the final version configuration of the AB41.

This one was built using a guide obtained from a reworked section of sprue to confer the correct curved shape to the box. The result is extremely near to the real one. The semi-cylinder obtained was detailed with ports in thin plate with hinges and stoppers in thin plate and copper wire.


The smoke bomb rack on the rear was detailed using thin plate, copper wire and plasticard .
The most complex parts in thin plate were the racks for spare jerry cans, placed all around the vehicle as standard layout on AB 43.

References are very important to understand the function of all devices so we can build them easily in perfect scale. In this way we detect articulations, stoppers and hinges.

After having used all these techniques I finally terminated the assembling work.


The model is ready to be painted and I’m going to describe this new process in a new article.
Have good modelling!