Painting tyres in scale is always a delicate operation because this element strongly characterizes our model, be it a half-track or a completely wheeled vehicle. Tyres become dirty in a typical way so we have to treat appropriately the rubber with the correct coat of dust and dry mud and according to the logic as the wheel interacted with the ground.

The shape of the tyre, the tread pattern, the nature of the terrain, the season, the direction of travel of the vehicle, the weathering are all factors that affect how this important element of the vehicle become dirty and appears to our eyes, so is important to collect as much documentation as possible about the assembled vehicle.
Dried mud and dust aren’t rare effects on tyres so we need to acquire the right ability for a credible way to reproduce it on our models, be they cars, jeeps, armored cars and halftracks.
During the next lesson I only used brushes and proceeded step by step in order to standardize and simplify the process as possible.
The basic color

I paint tyres not overall black, as often happens, but with an indefinite dark brown-black. I found the Rubber enamel colour by Testors as the right one (but it isn’t really important).
Wait few days the colour become dry because the next treatments on the base color are quite aggressive.
Weathering tires
Step 1: The color of the tread

First I just paint the tread with a mixture of oil colors: Naples yellow, a little Raw Umber and Yellow ocher diluted in white spirit (but the colors will be chosen according the theater of operations of the vehicle built). The mixture penetrates into the recesses and the tread pattern. If you want to give a little consistency and chromatic richness you can mix to oil colors also earthy tones of pigments.

The time to finish all the wheels and I come back to the first one with a cotton swab and white spirit to remove the color from surface details.
This procedure highlights the details and simulates dust and dried mud in the recesses of the tread.
Step2: Painting the sides of the tyre

At this step use, as well as oils, including a blend of my home made pigments from artist pigment powders. I take traces of pigment with a brush dipped in the color already on the ring near the rim of the tyre. There is no need to focus much on this step, though it is best not to cover the entire tyre ring but keep the middle part with less paint as possible.

The color should be placed now carefully nuanced, taking care to preserve this ring cleaner, using a brush soaked in white spirit. Make this until you are satisfied with the coverage and the smoothness of the color.
Step3: Finish with localized washes

At this point you make localized washing with the mixture of starting colors, a little more diluted and using a brush to highlight finer details of the tread of the tyre sides and to standardize and refine the previous treatments.

Step 4: Finishing and enhancement of tyre rubber

Now it is necessary to bring out the color of the rubber of the tyre becouse you need to add contrast to all otherwise flattened by treatments with oils and pigments.
With the brush slightly damp (not soaked!) in white spirit clean and wipe a thin ring on the side of the tyre.

This cleaner area of the tyre is often recognizable in old photos of vehicles operating. With the brush I’m going to fade even further in order to make the color more natural, like a real coat of dust and dried mud.
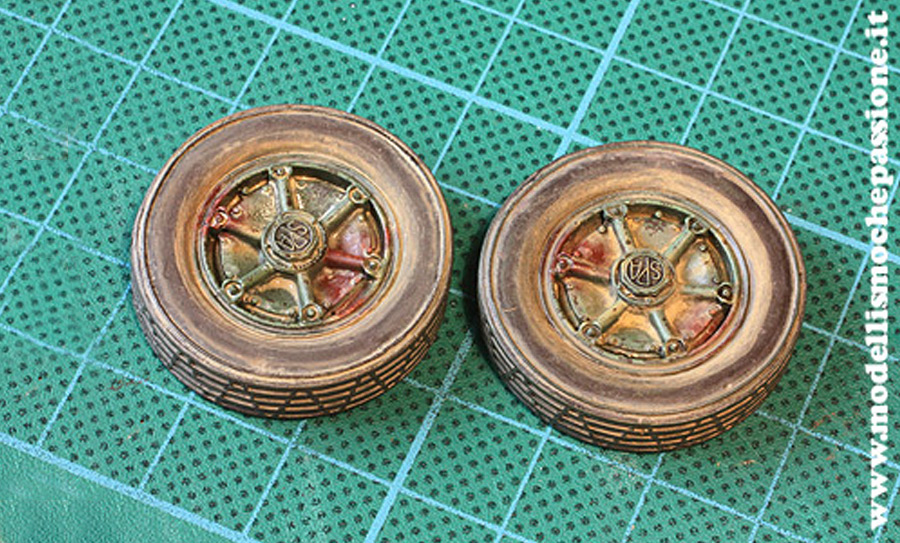
Your tyre is ready!

All that remains to do now is the treatment of the details such as arms, bolts and wheels with the same procedure adopted during the weathering of the surrounding areas the vehicle, blending and touching up the excess.

The result, when dry, it is extremely convincing, at least for my taste!

If you are interested in the subject used in this article you can read about how it was built.
Have fun
To meet Andrea go to the Staff page of modellismochepassione.it »