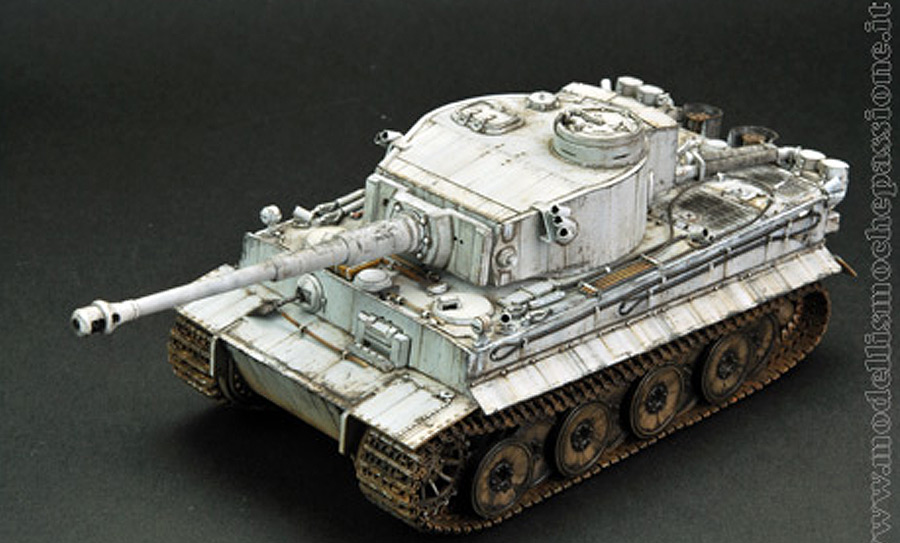
Without a doubt, the Panzer VI Tiger I was and will be for many years one of the most charismatic armored vehicles designed and built by modelers around the world. The special issue of MMI dedicated to the most legendary vehicle of World War II is a sample of this, and as globalization has taught us, even in China there is a year dedicated to Tiger!
Assembling the kit
Although there is no perfect model, perhaps this model of AFV in 1/48 gets there close enough. Not only the measures of all parts are almost perfect, but also the level of detail and his finesse is a delight to the extent of making one of the flagships of this scale.
The assembly of the model works out of the box, having been included as extra tracks single links by Friulmodel (a constant in almost all the models I build) and the barrel by Armoscale, which increase the level of detail to the already impressive cannon from AFV’s kit.

The idea of painting
I don’t know why, but almost all the models I made in 1/48 have a winter camouflage. Usually we’re used to paint winter camo with a high level of wear so the base color appears clearly under winter camouflage, as it’s true, after a long time from its applying.

A little tired by the usual theme, I decided to take on a new challenge: making a vehicle with a winter camouflage (another!), but this time with a pure white camouflage with the usual dirt and the addition of a little wear.
Phases of painting
Primer
The almost complete absence of parts in photoetching or resin on the vehicle would eliminate the use of a primer. Anyway, almost like a ritual, I like to start painting my models using a light coat of primer Gunze 1200, diluted with a solvent and using airbrush. Only the aluminum barrel has been treated with a primer Gunze Sangyo Metal.
As usual, the primer allows us to detect small defects, areas with glue accumulation and other assembly mistakes.
Basic Painting
During this step we apply the base colors of the different elements of the vehicle.

After a slight shadowing with black (Tamiya enamel), more thin layers of pure Tamiya white are applied over the entire surfaces, spraying it with different intensity. Sometimes a white color mix was used with panzer gray to give different shades to the vehicle surfaces, trying to give a certain depth effect to the model, creating darker areas around details and using pure white on the light maximum exposure areas, like the top of the turret, hatches for the driver and radio operator, and so on.

The lower part of the vehicle was airbrushed directly using Tamiya XF-72, which serves as the base color to the subsequent effect of wet mud.
Tools where painted whith base colours to distinguish between different materials and textures on the vehicle.
Dry Brush
Who said that dry brush is dead? The dry brush was, is and will be a vital tool for many effects that add realism by allowing the tank to reach even real aesthetic purposes.

The effect of peeling paint on the edges in areas of maximum friction is one of the effects which are perfect for playing with this technique.

The procedure was the following:
- Paint the model with completely generous layers of Tamiya clear gloss for a totally brilliant finish.
- Apply a profiling of all the details of the model with the oils to highlight and give depth.
- Using the dry brush technique, using acrylic dark gray, go to areas of greatest friction wear and handling of the car. At this stage, the dry brush is applied with a large brush, heavily with fast movements.
- Once you apply the brush dry with a cotton swab lightly moistened with water (or saliva, although in this case our model could be an interesting test for the CIS!), a stick or other pointed tool and a certain hardness (in making bristles too hard, for example) begins to refine the shape of the brush dry spots, giving them a specific intent in view of the appearance and nature of each of the points.

At this point, many will wonder how you can apply an acrylic paint with a dry brush so that it can then be easily removed. Well, the secret lies in the layer of gloss paint lying in the first step. This coating allows you to remove the paint even after hours or even days of your application without damaging the base. But be careful: if a part of the model has been discovered by the glossy paint it is almost impossible to remove the acrylic paint!

Similarly, many wonder why profiling is carried out in this phase. The answer is simple. The profile highlights the dark details of the model and somehow acts as a guide for the implementation of the next dry brush. Visually it is not appropriate add a new dark coat with drybrush over profiled details because we obtain an opposit effect, without the necessary contrast and much less interesting.
The “dirty cold”
The concept of “dirty cold” is nothing mysterious. It simply defines a technique that uses warm colors often used for aging military vehicles. A cold tone is therefore a dirt that is obtained with cool colors like blue, gray and brown color palette are certainly far removed from the usual golden suede, brown matte earth tones and warm yellow and red tones.

This dirt is applied with oils (natural shade, gray, black and white) on horizontal surfaces in the form of clouds and stains. Acrylic paint is applied on vertical surfaces for signs of dirty rain drops. It is very important for oils and acrylics to have more or less the same hue all the time. There are several circumstances where colors mixed themselves in very thin transparencies, acquiring their final configuration, the result of a meticulous and patient overlapping work.

Train rolling and Hull
In this phase, the final painting of the wheels and tracks is done by using the acrylic paint. So we obtain a first approximation because the final finishing on the wheels and tracks will be compleated when the model will fixed at the base of the diorama.

To this end, the base color you get is enriched with the addition of lights and shadows in black and light gray base color and XF-72 using the same color as dirty oils cold.
In addition, we applied highly diluted burnt umber color with white spirit and a bit of paint finish for the moisture effects in some parts of the tank.

Next article will describe how building a nice and simple diorama for this beautiful model.