At the end of the WW2 war industry produced on military vehicles the most singular and elaborated camouflages of the entire conflict and Italian those make no exception.
We can take one of these to describe its modeling painting technique and problems to solve in making these kind of camouflages.

Preparing the model
First of all we need to have the model disassembled in primary parts so every side and surface can be reached during painting process. In this case we have the body, wheels, turret and some main details.

The first coat of primer is useful to verify quality of assembling becouse make uniform used matherials, make in evidence defects, fixes some imperfections and cement all small details. In this case I used White Skull, Games Workshop by Citadel Colours.
Painting
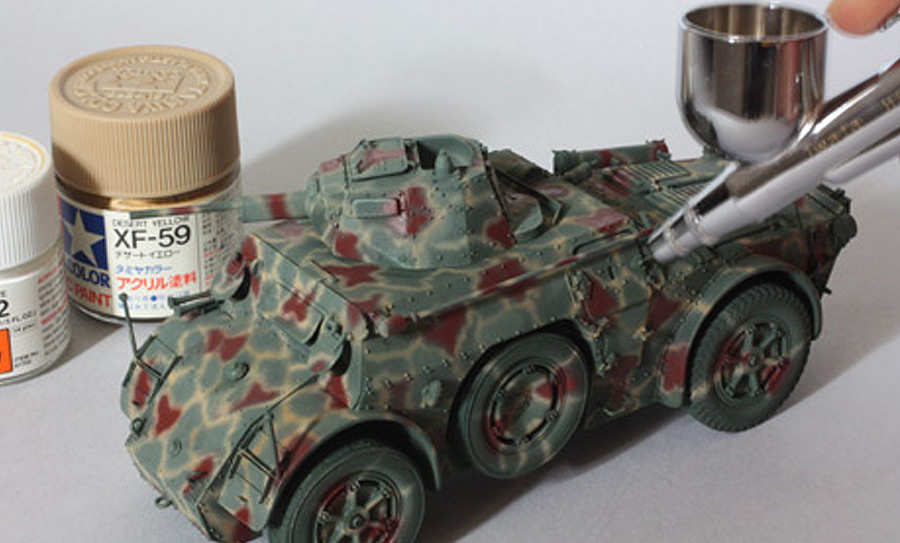
I use an Iwata HP-C double action airbrush, with 0,8 bar exercise pressure. It’s very important to find the right pressure and colours diluition to obtain the necessary fine and fluid erogation with no stops of the nozzle.

First background color is the italian grey-green; usually we start from the lighter to the darker (it’s easier to cover a light surface than a dark) but now I proceeded according the real sequence.
So I mixed Tamiya XF11 green with white XF2 for desaturation effect, all diluited with Tamiya X20A acrilic thinner.

For a light modulation effect I sprayed the first mixture added with XF59, no more possible after next passages to the other colours of the camouflage.

Now is the time of the second colour of the camouflage: the red brown in irregular spots was obtained with a mix of acrilic colour H47 Mr.Hobby with XF2 Tamiya.

At this step I forgot for a time the airbrush to make the first drybrush treat to the model. I make this first to create lighting effects on surfaces and some weathering on the paint, sometimes turning around the red brown spots. I used Humbrol enamels M117, 104 and 87 to obtain a cold mixture of the base green.

The moment of third colour is come; the thiny mesh of italian sand yellow stripes so characteristic of this kind of camouflage. Now I used acrilic Tamiya XF59 with some of XF2. The difficulty was to obtain the correct thiny line in one single passage. During this step the great problem is work with slow pressure without cause obstructions to the nozzle. Sometimes I caused mistakes solved with another passage with green. Correct mix of pressure and diluition of the paint (I tried to work at 0.8 bar) is important for success and we have to make a lot of tries.

After Camouflage was done we spray over all a semigloss varnish Tamiya TS79. This make easier next steps and make more real and “alive” surfaces.
Weathering

During this step we make the so called “lining“: every detail is profiled with a dark mix of oil colours diluited with white spirit. We use Bruno Vandyke by Windsor & Newton and Ivory black by Maimeri Artisti.

Another drybrush with Humbrol enamels to make uniform camouflage and give a little weathering affect on secondary colours of the camo, giving more contrast to details and surfaces.
Humbrol M117, M88 and M34 mix was now used. As no more cool, the drybrush tecnique is an easy and useful way to make real our models but we have to do care and proceed step by step without thinking to obtain final effect with one only passage.

This is the chipping time! We use a fine brush and work on worn surfaces by crew’s activity. Now we need to painting carefully because is really easy to exagerate and obtain the opposite effect, oversizing the scale of the model.

Pay attention and painting carefully is a must: better is less than more. Now we used a dark brown mix of Humbrol black and M100 red-brown.

Next step is make model dirty and dusty. To do this we used a mixture of oil colours and home made pigments. Raw Umber and Naples yellow from Windows & Newton mixed with a pigments mixture near to the earth colour. Sometime dry, sometime diluited with white spirit, we apply a small part of colour proceeding from down to up. Photographic references are very important to reach the maximum level of realism. Wheels were painted with a similiar and specific technique described in another article.

We have to treat external details with carefully and attention to obtain the same fine effects of dusty and dirty around them using the same mixture diluited with white spirit. Paint mixture, very diluited, is placed around details and become visible when completely dry.

Treatments now described needs no strict application order. I made new chipping phase with green tones to add more levels of damages on the colors of camouflage.

Dry splashes of mud, dust and rust stripes are simulated with a mix of oil colours before used for chassis and wheels or similar tones of Humbrol enamels. Pay always attention to the scale reduction.

The final touch is the balkenkreuz from dry transfers by Verlinden. In this case cut the symbol from sheet and place in position with the help of a piece of tape. In case of mistake we can remove with a piece of tape and replace with another transfer.

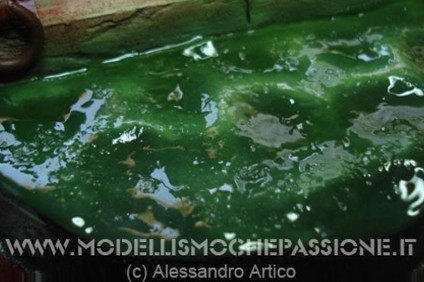
An overview of the final camouflage end the weathering work. Next article in the gallery section will shows the finished model in detail.
About this model see also “How detailing models without use photoetched parts“.
Meet Andrea on the page “the team of modellismochepassione.it” »