This article is an opportunity to make an inventory of the equipment that I have amassed over the years and that allows me to achieve a good standard of achievement in static military modelling. I hereby wish to share my experience on this subject with all my friends of ‘Modellismo che passion!’
During my modelling career I came to realize that the basic equipment one gathers to begin working, basically remains the backbone of the equipment of every modeller and this will only rarely be upgraded with new and sophisticated tools. Indeed, contrary to what many may think, I believe that this is the beauty of static military modelling: the potential simplicity and economy of materials.
In any case, I have indicated first the essential tools required to tackle the construction of a basic model and even super-detailing, be it plastic, resin or white metal. Other, more sophisticated tools required for scratch building will be dealt with in other articles.
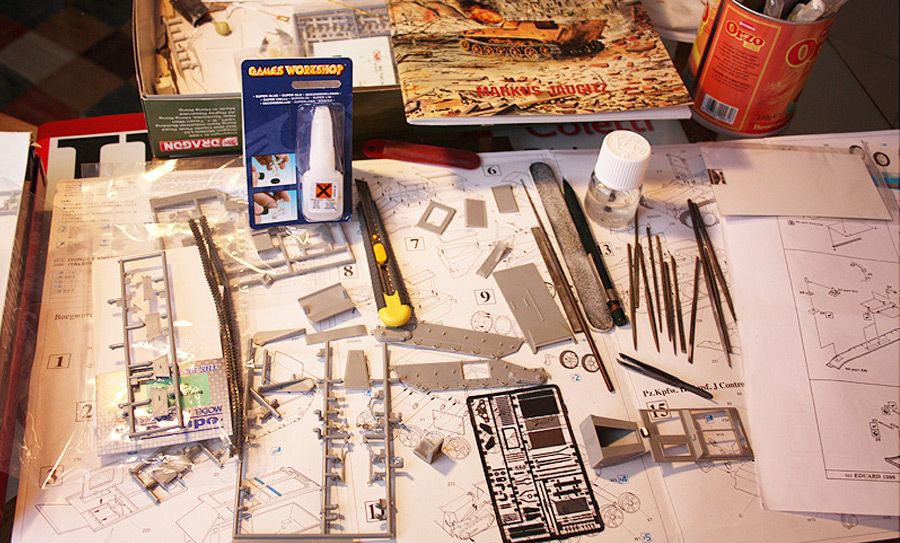
The ideal arrangement for any modeller is to set up a room / workshop where one can keep everything close at hand, and where one can quit a modelling session but still be able to start another session without having to spread or pull out all the equipment . If, like me, you’re not in this privileged situation, choose at least a large enough and well illuminated area [naturally and artificially] , on which you can spread printed materials, documentation and instructions that you can quickly refer to when required.
Cutting surface
Having damaged tables and other surfaces on which I had worked during my modelling career, I eventually decided to get myself a cutting mat or cutting surface which one can find in fine arts and graphics shops. They come in various sizes, making it possible to choose the one most appropriate for our needs. What’s more, they may have squares and grids which turn them into a very useful tool when cutting plasticard, sheet-metal, copper wire, etc. Cutting out parts from the sprue-tree will no longer hold you in fear of damaging your table.
Cutters.
Probably the most important modelling tool is the cutter or knife, whatever it may be called. They came in all shapes and sizes and can be found in fine arts, hobby and DIY shops and supermarkets. The ones with interchangeable and breackable blades for the perfect cut, is the type I often use. Cheap and effective if you have the foresight to choose an item which allows a good grip and secure fastening of the blade that avoids movement of the same blade at moments of greatest force exerted.
Files.
It is possible to find file sets of various sizes at hardware stores. My file set includes the various sections: Square, rectangular, round and triangular. Good quality files are made to produce different types of cutting, in order to obtain different depth of material removal during filing.
Generally used for quick removal of excess white metal, resin or plastic and they can easily be cleaned with a wire brush.
Tweezers and scissors
Both of these tools are very useful and not necessarily expensive, I have a pretty cheap pair(the equipment for manicure and beauty care of our wives may be an inexhaustible source for us modellers) with which to handle small details if necessary. What is certain is that a good pair of tweezers, which ensures a good grip, it will save you a lot of time to look for small pieces that might easily run astray.
I do not use scissors frequently, but I do have a pair to cut thin sheets of sheet metal or plastic sheets and help to remove some pieces stuck in a particular way to sprue.
Pliers and clippers
Given the increase, in standard kits, of photo-etched parts and the ever increasing use of scratch building in sheet metal and wire, I have equipped myself with a small number of pliers and clippers. Electricians’ pliers are very useful in cutting brass and copper rods. These pliers are very effective in cutting plastic parts, excess sprue or for the removal of large parts from the sprue–tree. They cut cleanly and also remove the small residue around plastic parts. If your local model shop does not have them, try finding them from hardware stores.
Measurement and calculation tools
Squares, rulers transparent plastic and metal, gauge and compass are essential for the various phases of super-detailing of a model.
A couple of good squares for drawing are very useful to me if I have to draw on sheets of plasticard or sheet metal parts to be cut out to replace the often oversized components of most plastic kits. Only trick is not to use them for cutting but replacing them with rulers or metal brackets that are far more resistant to the blades of the cutter!
The compass is useful to get correct and repeated measurements on profiles and sheets to be cut.
The vernier calliper is a type of gauge that consists of a graduated ruler made in two parts that slide axially over each other. It is provided with appendages (beaks and jaws) which serve as stoppers for the distances to be measured. It is mainly used to measure the distance between two symmetrically opposing sides (e.g. thickness of a plate, diameter of a rod, etc.)
Drill and drill bits
Now, I no longer build straight out of the box. The limitations imposed by mass production lead to the necessity of having to add more details and since I use various materials, it is sometimes necessary to use power tools, which make a job neater and much quicker than if done manually.
My driller is and old Minicraft, which I use for various tasks: drilling of course, but also for cutting, sanding, polishing, etc. The numerous bits and tools allow for a very wide variety of uses.
If you decide to buy one, you need to ensure that it is equipped with a speed regulator. Before buying, make sure the driller sits comfortably in your hand and the switch is easily accessible. Consider also the weight; sometimes you might need to use it for considerable periods of time. As mentioned already, tools and accessories are many and in part may be supplied as standard. A set of cutters is very important, along with one or two cylindrical types. All my chucks can hold abrasive discs. These discs are mounted on a supported shank and secured with a screw. The shank is inserted into the chuck like a normal twist drill. With drillers, you can work on any metal, remove burrs, etc…..and they are not expensive.
To delicately drill brass, copper, etc, I use a pin-vice on which it is possible to inset tiny bits for drilling metal; there are some very fine ones which have to be handled with extreme care as they break very easily.
Metal Chisels and spatulas
In modelling, there are various exhibitions stands of companies that produce hobby tools, in which surpluses are offered. . At reduced prices, one can get excellent tools, ideal for working and shaping some soft materials, such as epoxy filler. Not using them very often I’ve got just a small assortment with various tips and straight and curved spatulas.
Frequently used products
This term includes glue, sandpaper and epoxy fillers. All models, be they straight from the box, converted, scratch-built and of any material, need glue to hold together the various parts. I usually use three types: the liquid type for plastic [the more liquid the better], cyanoacylate and PVA glue. To these I can add the two part epoxy glue that is not used very often.
Glue for plastic
For plastic models, the best glue is liquid adhesive. This is available in various types with differing efficiency; poor, effective, very dangerous. All plastic adhesives are solvents and function by melting the plastic surfaces and welding them together. The more liquid the adhesive, the stronger the glue and the bond. If the glue is of the consistency of water it will provide a very good, capillary action – apply the glue in one spot and it will move correctly along the joint., This characteristic, normally offers a great advantage but extreme care must be taken because it’s quite easy to leave one’s own finger prints in the plastic which may prove quite difficult to remove completely afterwards. Remember to ventilate the room to reduce exposure to vapours.
Epoxy adhesive
This is made up of two components: adhesive and hardener. It is necessary to mix equal amounts from each tube: Once mixed and applied, it takes from five to ten minutes for the glue to start being effective. Another twenty four hours are needed for it to dry and cure completely. It’s a strange glue that tends to stretch when mixed and it’s quite difficult to apply in small amounts. In its favour is its high strength and the long time afforded to work with it. Very useful for fixing structural parts.
Cyanoacylate
Commonly known as Superglue [attack], it has led to considerable improvements in the quality of models especially after the introduction of resin and photo-etch detailing sets. Super glue offers great tensile strength [very difficult to separate] but yields to cutting [in the case the parts are bent and separated]. It is remarkable for fixing small photo-etch details and for joining plasticard strips or small copper wire details or resin parts. The problem with this glue is its method of application: I apply it in drops on a plastic plate, from which I pick it up with a toothpick in the amount that is needed. Drying time may vary from a few seconds to half an hour, depending on atmospheric conditions. If the glue is poured on a piece of wax paper, it can remain liquid for longer. In theory, one single drop should suffice for a whole evening’s work session. Unfortunately, more is lost through drying than actually used.
White glue [PVA]
It’s a non toxic glue that is useful for those jobs that do not require a very high resistance; to attach stowed equipment on tanks or fix bags and flags. When dry, it becomes transparent and shrinks. One big advantage is its ability to reconstitute itself if wetted while still fresh.
Sandpaper
An essential ingredient in modelling is sandpaper. There are two types – grit and glass sandpaper. I use the first because it can be wetted, lasts longer and is easier to use. All sandpaper remove excess material rather rapidly. The grit type is wetted with water in order to make its surface lass abrasive [with the glass type, immersion in water actually destroys the glue that bond the abrasive particles]. Sand paper is available in sheets of various grades; I use three kinds, the roughest of 320, the medium of 600 and the finest of 1200. With the mentioned grades, you can get all the necessary finishes. Besides these sheets, I also use strips of different grade glass paper.
Recently I discovered the usefulness of abrasive nail files. These have the advantage of readily mounted on a very handy handle and they have two grades that all in all are standard for use on models.
Epoxies
An indispensible aid for the modeller, these fillers are generally formed from two components. Like epoxy adhesive, a chemical reaction takes place when the two agents are mixed. The kind I use is universally known as Milliput. It dries in three or four hours in normal room temperature and even quicker when heated [e.g. with a hair drier]. Completely shapeable when mixed, the filler can be used to plug holes and to model particularly difficult items. I use it mainly to make the anti-magnetic Zimmerit paste on German tanks. When dry, it becomes hard as rock and can be sawn, filed, sanded or worked in any way. One of the modeller’s best friends.
Other consumer products
Even steel-wool is a superb abrasive. I use the 0000 type that is normally used for cleaning pots and it is perfect for the final clean-up of plastic, brass, etc. It can be found in supermarkets or hardware stores. I also use a huge quantity of adhesive tapes, caulking putty, various kinds of tissues and so on.
In conclusion, these are the principle tools and materials required for ‘‘out of the box’’ construction but which I also end up using for conversion work, scratch building and super-detailing.
Health and safety during work sessions
Many of the tools used for modelling can be potentially hazardous to health because of sharp edges of blades, glue and paint fumes, inflammability of certain substances, be they solid, liquid or gaseous.
The advice then is to handle blades and files with care, ventilate frequently the work place [it’s known that winter is the best time to do modelling and the temptation to stay warm, closed inside is great]. When not needed, keep all paint and glue containers closed and check they are not leaking. Valid alternatives are cabinets with purging systems for hazardous vapours or wearing a protective mask against solvents and aerosols, making sure of replacing the filters when due.
Another important precaution when working with polyurethane resins is the inhalation of it dust particles when drilled, filed or sanded. To avoid this, it’s best to wet the tools and sandpaper to contain the spreading of this dust in the air.
Happy modelling to all and have fun.